Categories
Bulk Scheduling Posts with Social Blaze
Are you looking for a way to schedule your social postings in bulk to make your social media management “effortless”?
Well, Social Blaze lets you bulk schedule your posts, where you can create many posts and automate their scheduling. This can be done using a CSV or text file. For this, you will need to first create a CSV file in the right format to be able to use it in Social Blaze for bulk scheduling.
Note: You can schedule both image and text posts in bulk in Social Blaze.
How To Create A CSV File?
The formats for creating a CSV for image and text bulk posts vary. The steps for both of these formats are given below:
- 1st Column: Contains the post description/title with the post URL. For example: How To Optimize Your Website Design For SEO? https://bit.ly/3Zf3bsT
- 2nd Column: If you are creating a CSV file for link posts, leave this column blank. But if you want to share the post as an Image Post in bulk, add the image URL in this column.
- 3rd Column: Specify a date and time you want to publish your post for.
Remember that you can choose any format for the date and time format as selected in “Your Profile” → “Date and Time”.
Note: When adding the image URL in the 2nd column, make sure it’s a public URL. This means, only the image is visible to the audience and not the entire website. However, if your image files are saved on your computer or in your Google Drive, you can easily upload them later while reviewing the list in Social Blaze’s bulk scheduler list.
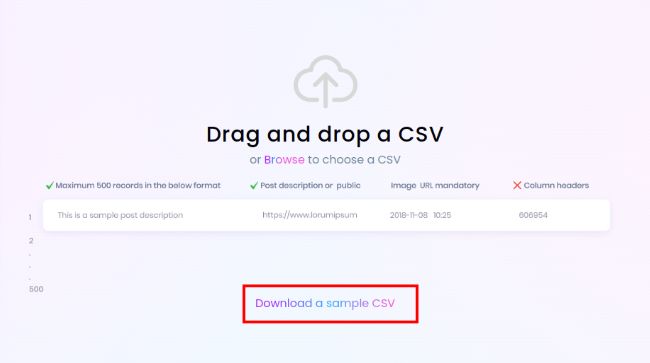
To avoid any confusions and effort in creating a CSV file, you can also download a sample CSV file from Social Blaze and use it.
On the Dashboard, go to the “Post” → “Bulk Schedule”. From there, you can find the link to “ Download a sample CSV.”
How to save a CSV file?
- Excel To CSV File
If you choose to create a CSV file using excel, simply save the sheet with .CSV extension once you have added the entries to the sheet. For this:
- Go to File → Save As.
- From the “Save As Type” drop-down, choose “CSV (comma-delimited)”.
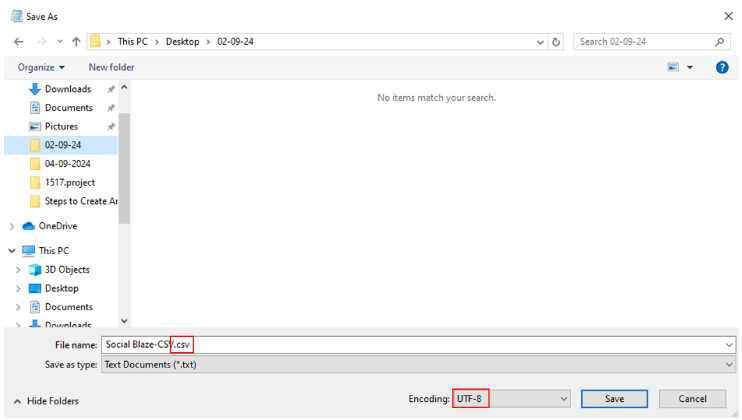
- Text To CSV File
If you choose to create a CSV file on your text editor or Notepad, use a comma to separate the fields. Also, write your post descriptions in double-quotes (“ “). Save the file in UTF-8 format.
Key Points To Consider
If you see a replacement character � while uploading your CSV, it could be because:
- You might be using an outdated version of MS Office/Excel.
- The CSV file may not be in the UTF-8 format.
To ensure your file is uploaded correctly, follow these steps:
- Right-click on the Excel/CSV file, navigate to “Open with” → “Notepad”.
- Rename the file name and add .csv as an extension. Make sure to choose UTF-8 as the encoding.
Doing this will resolve the issue of replacement character. Now, you can upload this file in Bulk Scheduling.
How to Bulk Schedule Posts?
So now that your CSV file is ready, let’s get to know the steps of bulk scheduling:
- Sign into your Social Blaze account.
- On the dashboard → select “Posts” → “Bulk Schedule”
- The Bulk Schedule page will open.
- Click on “Drag and drop a CSV” or “Browse” button to upload a CSV file you created as per the above instructions.
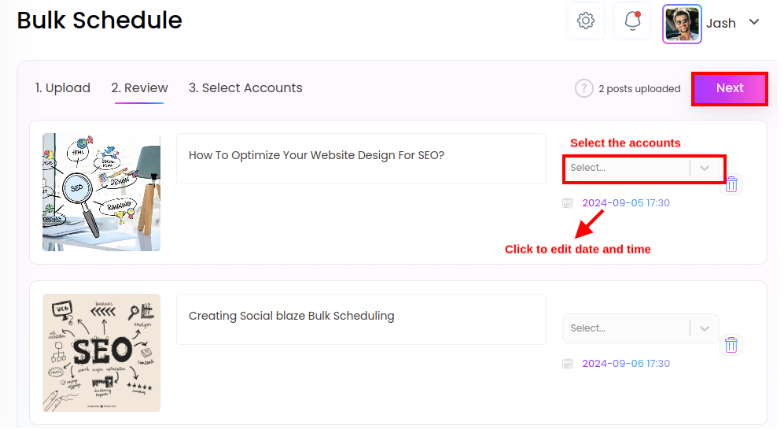
- Once your CSV data is uploaded, you can add accounts to the posts. You can also edit the date and time of each of your posts.
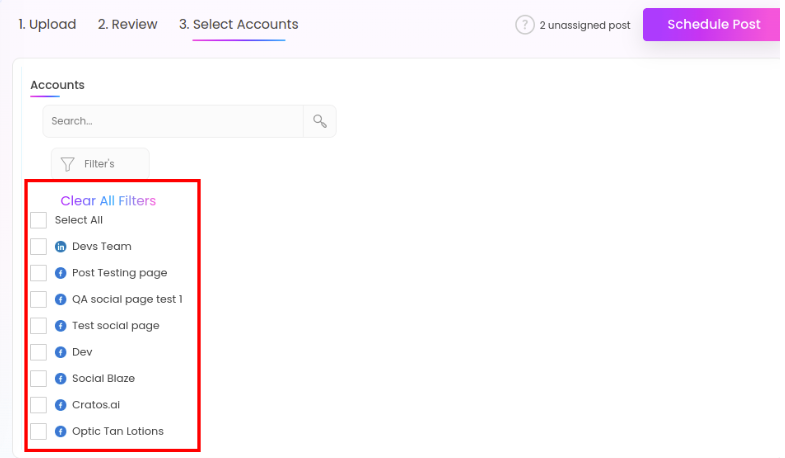
- Once done, click on “Next”. You will be redirected to the “Select Accounts” tab.
From here, you can choose any group or client to schedule bulk posts for. However, please note that you can bulk schedule for only one Twitter account at a time.
Lastly, click on the “Schedule Post” button to schedule your posts for the future. To check all your scheduled posts, go to “Manage Posts”.